 Log in

Key takeaways
- Writing a check requires six steps: dating it, naming the payee, writing the amount in both numbers and words, adding an optional memo, and signing.
- You’ll need a pen with blue or black ink and enough money in your account to cover the check.
- It’s a good practice to verify the payee’s name and dollar amount before handing over your check to pay your rent, bills, or other expenses.
- Keep records of every check you write to track your spending and catch errors.
While they might not seem common in today’s digital world, paper checks still play an essential role in the banking system. Knowing how to write one is a helpful personal finance skill, as you may need to use one to pay your rent, make a financial gift or donation, or handle other bills.
Here’s a closer look at how to write a check correctly, plus some tips to help protect your own money when handling your checkbook.
Step-by-step guide to writing a check
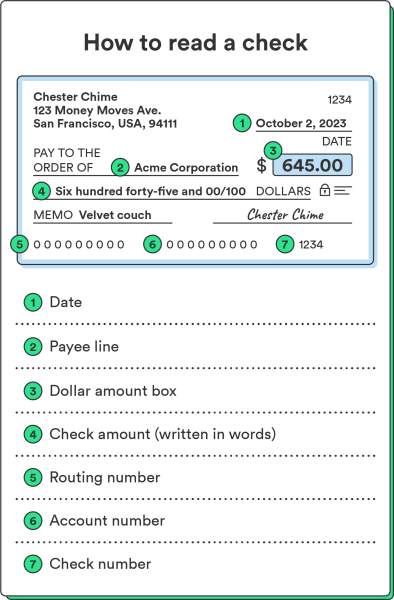
To write a check, you’ll fill out six fields on the front:
- Date
- Payee name
- Numerical amount
- Written amount
- Optional memo
- Your signature
Each field plays a specific role in making sure your payment goes through correctly.
The person writing the check should write only on the front. The recipient endorses the check on the back. Learn how to endorse a check for mobile deposit.
Step 1: Date the check
First, enter the date. This section is typically in the top-right corner of a check, near the check number. Write the current month, day, and year. Leaving this field blank or entering the information incorrectly could cause problems when depositing the check.
Step 2: Write the payee’s name
Following the text “pay to the order of,” write the name of the person or company you’re paying. The recipient’s name must match the name on the bank account where the check will be deposited. Be sure to spell the name correctly to avoid any issues and allow the payee to deposit the check easily.
Step 3: Write the payment amount in numbers
Next to the payee’s name, write the payment amount using numerals. The amount should be written clearly, including a decimal and the number of cents – even if it’s a round-dollar amount.
Here are examples of how to write different amounts:
- $100.00 for even one hundred dollars
- $50.75 for fifty dollars and seventy-five cents
- $1,525.50 for one thousand five hundred twenty-five dollars and fifty cents
Step 4: Write the payment amount in words
Below the payee’s name, you’ll write the check’s value again, but spelled out in words. This written portion should match the numerical figure above.
When writing a check for 100 dollars, you’d write “one hundred.” For cents, write them as a fraction over 100. For example, on a check for 100 dollars and 75 cents, you would write “one hundred and 75/100.”
You don’t need to include the word “dollars” since it’s already printed at the end of the line.
Step 5: Write an optional memo
While the bank doesn’t use the memo line for processing, you can fill in a note about what the check is for on the memo line. Some companies ask you to write an account number on the memo line so they know where to credit the payment. You could also put something like “groceries” or “registration fee” on the check to remind you what it was for.
Step 6: Sign the check
Once everything else is filled in accurately, sign your name on the signature line. Write your name legibly and consistently. The bank may compare your signature with signatures on past checks or forms to verify that you truly signed it.
Example of a completed check
To help you know if you’re completing your check correctly, here’s an example of what a completed check should look like:
Once you complete your check, you can deposit it through a mobile banking app or at your local branch if offered by your financial institution.
What to consider before writing a check
Before writing a check, take a moment to prepare. Here’s what you need to get ready:
- Check your account balance: Make sure you have enough money to cover the check amount. If the check bounces, you could face a non-sufficient funds fee or overdraft fee, and the recipient may also be charged a fee.
- Use a pen with blue or black ink: Fraudsters can erase and alter pencil. Using a pen helps keep your check information secure. Blue or blank ink ensures the check is scannable upon deposit.
- Write clearly and legibly: Poor handwriting can cause processing errors. Make sure your writing is easy to read for both people and computers.
- Keep a check register: Track every check you write to help verify transactions on your monthly statement and catch any errors.
How to keep records of your checks
Once you’ve completed your check, log it in your check register or preferred digital tracking method.
Good documentation helps you avoid overdrafting your account and forgetting who you paid. It can also be helpful to have a record of your checks and expenses when you file your taxes. These details can be invaluable if you find an error or inconsistency in the future.
Tips to protect yourself from check fraud
When writing a check, you can take steps to reduce the risk of check fraud and keep your information private. Because a check contains your account and personal information, it can be used for identity theft or to make unauthorized withdrawals. Follow these tips to protect your funds.
- Never leave checks blank or incomplete: A blank or partially filled check lets fraudsters write in whatever they want. Fill in the payee name and amount before handing over the check.
- Keep your signature consistent: Banks can compare signatures to verify authenticity. A consistent signature makes it easier to spot unauthorized checks from your account.
- Don’t use “cash” as the payee: Anyone can cash a check written to “cash.” If it’s lost or stolen, you may not be able to recover the funds.
- Store carbon copies securely: Some checkbooks include carbon copies for your records. While convenient, these copies contain sensitive information that could be used for fraud or identity theft.
- Review transactions regularly: Check your bank statement for errors or signs of fraud that could lead to identity theft. If you spot something you don’t recognize, contact your financial institution right away.
Write checks with confidence
When using checks, be aware of how they can be misused, and regularly review your transaction history for fraud or scams. When you know how to write a check, you can more confidently manage your money.
Frequently asked questions about writing checks
How do you write cents on a check?
Write cents as a fraction over 100. For example, you’d write “One hundred and 75/100” for $100.75.
How do I write a check for $1,500?
Write “1,500.00” in the dollar box, then write “One thousand five hundred and 00/100” on the line below the payee’s name.
What should I do if I make a mistake writing a check?
Draw a single line through a minor error and add your initials. Write ‘VOID’ across a check with a significant mistake and start over with a new one.
Do I have to fill out the memo line?
The memo line is optional but helpful for tracking what the check is for, such as “Rent” or an account number.
Can I write a check to myself?
Yes, write your own name on the “Pay to the order of” line to move money between accounts or withdraw cash.